
Shaker style table
After building a lot of my own furniture, this table represents my first foray into fine furniture making. I love it.

The design is inspired by Shaker style furniture I have seen at Shaker villages I have visited in Massachusetts, New York and New Hampshire, and have admired in books for years.

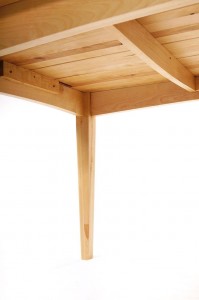
The slight arc to the rails as well as the taper to the legs are probably what I most associate with the Shaker design.

I chose white birch for the species, because of it’s local prevalence on the shores of Lake Superior. Yellow birch is also found in lesser numbers, and I picked its more reddish hues for the subtlety contrasting inlay.

Chances are that even this level of adornment or decoration would not have found the approval of Shaker craftsmen in their time.

Though the effort that went into creating it is certainly a part of the process I would like to think they’d appreciate.

The frame and arches in the corners at the head of the table are taken from a theme found in ‘The Trappers Daughter‘ series of prints by the owners . 

Luck had it that the lot of boards I purchased for this project contained a piece that has a wavy character. Perfect for the breadboard at the head and foot of the table.
 The ‘joists’ ( I am still a timber framer by training and not yet familiar with table part names) are dovetailed over their entire length and allow for expansion and contraction. Which is considerable with birch, as I have been warned.

Making the table


Gluing up table top and leg blanks.

The outside faces are cut out of one board, for the look of a solid piece.

Four legs with two mortises each.

Rough stringer. Routing template. Stringer with an arc.

An impatient first look at a raw assembly.


Docking a tenon on the stringers.

Shaping the table legs.


Dry fit. Glued and pegged.

The short sides first.

And the long rails.
Keeping the table top flat!


With a classic bread board.
Glued and pegged at the center tenon, slotted peg holes in the outer tenons and extra wide mortises to allow for expansions and contraction.

Long tight fitting dovetailed ‘joists’ on the underside of the table give strength and allow for movement.


The part of the dovetail slot that shows gets plugged.

This box connects the frame to the top on the sides.

These pieces help attach the frame to the table top at the head and foot.

They are dovetailed, dropped into the slot…

…and slide over into the center.

The next impatient look at an all but finished frame.
Inlay

Two slats in the top were milled skinnier and the top an bottom are routed just inside of the breadboard.

Now the arches.

First pass.

Finished semi-circle channel
 .
.
Setup for the yellow birch inlay pieces.

A bit hillbilly-style with cardboard and tape…


…but astonishingly precise!

Second pass.

A closer look at the setup: A clamped piece of plywood to provide a pivot point that the swing arm can nail into. There are four nail holes in this swingers to position the router. Fine adjustment is made in the bracket, which in turn is snapped onto the little crossbar.

The beautifully shaped inlay pieces.


Dry fitted … glued and clamped.


Fresh out of the press … and sanded.


Trim the top of the arch.

A bunch of little short pieces so that the inlay won’t fight the rest of the table when expanding or contracting … and straight on to the bread board

There it is.
In all its unfinished glory.


The finish is ‘Rubio Monocoat’. A new product for me that comes highly recommended.


Ger! We LOVE our table. Thank you so much. It has added immensely to our home and our quality of life. 🙂
Gerald, you are doing great work!!
Hats off! Very Nice
Greetings
Thomas